Tags
allhailskippy, boo, Boo plush, craft, crafts, dftba, DIY, doll, ghost, Ghost doll, How to make a boo, How to make a boo doll, how-to, HowTo, Make a ghost, Mario Bros, Mario ghost, Nerd crafting, nerdcrafting, ow to make a mario plushy, pattern, plush, reddit, Sew a boo, Sew a ghost, Super Mario, That's PS!, thatsps, tutorial
I’ve been asked several times by people to tell them how I made my boo plush. And I’ve been promising to get them a pattern for awhile now.
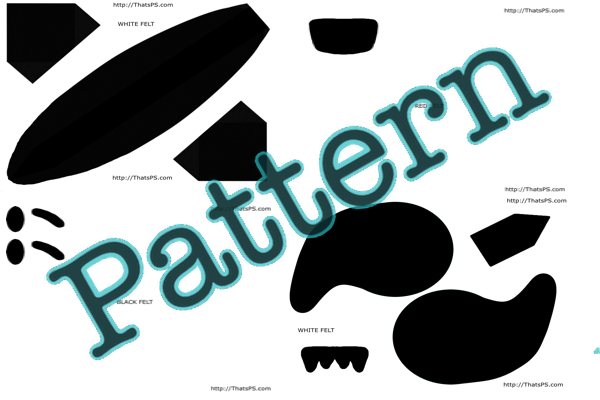
Today I make good on that promise, and have made a pattern for you to follow, and a step by step guide on how to make a Super Mario Bros Boo plushy.
You can read the original article here
First things first, download and print out the pattern from here
Step 1: Gather all your materials and cut out each of the pieces of the pattern

Step 2: Cut out all the pieces of felt

Step 3: Stitch one of the side pieces to the center piece. Make sure to line up the tail starting at the tip

Step 4: Line up the skinny house piece with the top of the center piece, and continue to stitch along the side piece. Once that’s done, stitch the center and house pieces together

Step 5: Repeat for the other side. Make sure you don’t sew the tail shut yet. We’ll do that later

Step 6: Turn the whole thing inside out through the tail

Step 7: Stuff the body full of polyester fiberfill. It can hold a lot more than it looks like. Make sure to pack it in as tight as you can

Step 8: Sew the tail shut. I had to fold the sides in a bit, and then sew it together so it would look right.

Step 9: Fold the big house pieces in half and then sew them both along the wall and roof parts. Don’t sew the bottom shut.

Step 10: Flip the wings inside out, stuff with polyfill and then sew the bottoms shut.

Step 11: One of the trickiest steps. Sew the wings onto the body.

Step 12: Using some hot glue, put the mouth on

Step 13: Glue the teeth onto the mouth. This is really where it starts to look like a Boo to me (IMO)

Step 14: Glue the eyes on

Step 15: Last but not least, glue the eyebrows on. And you’re done! Enjoy your new Boo plushy!


I’m having my son’s birthday on the 26th of October and would like it to be a Halloween party too. He loves Mario, so I wish I could find more stuff having to do with the Haunted Mansion. That would be perfect!!!! I’m definitely going to make these. Any other ideas???